The Beginner’s Guide to Stand Up Paddle Boarding
You’ve seen them. Those super fit guys and gals having a blast while paddling across the lake or tearing it up on the surf break. Have you ever wanted to join them but didn’t know where to start? We’ll we’ve got you covered! We’ve put together the most comprehensive guide to help you learn how to stand up paddle board.
Stand up paddle boarding – or SUP for short – all began in Waikiki, Oahu in the 1950/60s and re-emerged in popularity again around the end of the 1990s. From this point it spread with wildfire-like rapidity around the world, mostly thanks to endorsements from big wave surfing super-hero Laird Hamilton and Hawaiian surfer Rick Thomas who introduced the sport to the U.S. mainland.
There are a multitude of reasons for SUP’s meteoric rise and rise – each of which on their own could explain why it has, for a while now, ranked as the world’s fastest growing water sport; here are just a few of them:
- It is super-easy to learn – acquiring skill levels in most sports can be a long and drawn out – not to mention frustrating – process but the nature of SUP allows for a satisfyingly fast learning curve. Even fully signed up members to the ‘I-don’t-do-sport’ group are likely to be pleasantly surprised.
- For all fitness levels – entry into the world of SUP is suitable for those right at the bottom of the fitness pile to those at the peak of their physical ability looking for opportunities to push themselves to the highest echelon of sporting extremes.
- For all ages – From grandchild to grandparent and everything in between – everyone can play.
- On any body of water – A puddle may be pushing it but otherwise where you see water you can SUP – on the ocean (big waves, little waves or totally flat), rivers, lakes, ponds, estuaries, reservoirs or any other waterway you can think of.
- Solitary or social – An ideal pursuit for those who like some all-for-me time away from everything but equally good for mixing it up with friends, family or other like-minded souls.
- As a complete body workout – Cardiovascular fitness levels, core strength, balance, flexibility, toning of arms, legs and torso – all of this will improve with SUP and is one of the reasons the sport is so popular as a cross-training method.
- You choose what you want it to be – Most sports have an all-or-nothing nature but SUP isn’t like that and can be molded into whatever type of experience you want it to be – from very low level exertion to ultimate work-out.
- You also choose the theme – it can be a meditation exercise, a means of feeding your adrenalin habit, a way to get super-fit, an excuse to get outdoors, for relaxation, to see otherwise inaccessible hidden places of the heart-achingly beautiful variety or…just insert a motive of your own choosing. It all depends on how and in what environments you use your board.
- Fun for free – Once you’ve kitted yourself out with the basics your hours of stand up paddle boarding come free with nature – unless of course you want to use some private waterway.
What does a SUP Beginner need?
A Board
The Adventurer is a great beginner SUP board.
There are as many different types of SUP boards as there are places in which you can use them with the most obvious variations found in width and length. Somewhere down the line you may decide which SUP route you want to focus on – for example river boarding, wave surfing etc. – and consequently invest in the board which will enable the optimum performance in that niche. However, the best board for a beginner is what is known as an all-round or cruiser board because it typically offers the most flotation and the biggest and most stable platform; just what is needed in the early days to make the learning process safer and easier while optimizing your progress rate. Additionally, although it is designed for flat water use, it can perform to some degree in all conditions and environments – a versatility which might prove of value as your skill levels progress and you want to diversify.
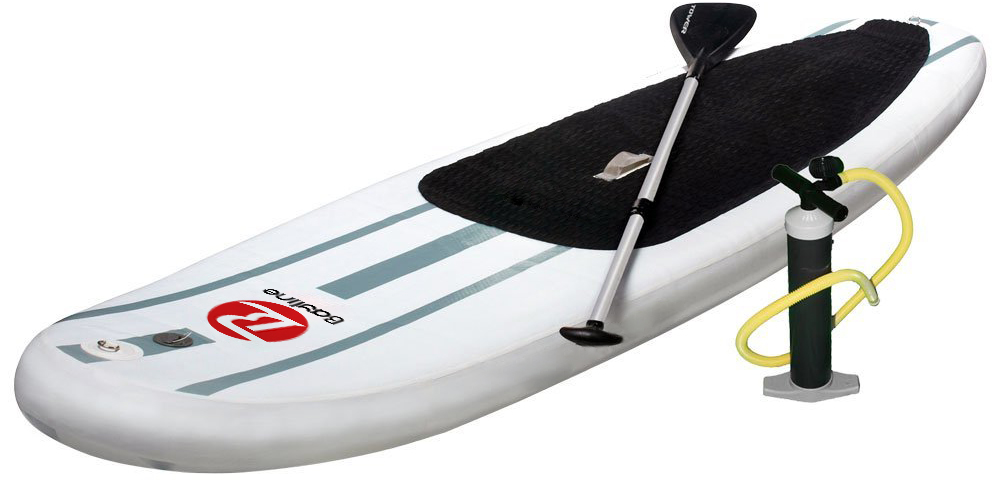
Another form which beginners might like to consider is the inflatable board. Once-upon-a-time the SUP board fraternity was a little sniffy where inflatables were concerned but times change and the new design innovations have put this kind of board well and truly in the mix. The biggest advantage of an inflatable board is that it can be packed away to backpack size which instantly removes transportation issues or the ooh-this-thing-is-heavy element of carrying your kit to the water.
One such board which seems to attract attention as an all-round, beginner-suitable inflatable is the Adventurer SUP package made by Bayline Paddle Boards (Pictured).
A Paddle
A paddle transfers the energy you expend into propulsion, speed and maneuvering and some will do this better than others depending on their length, design and the material they are made from.
On the subject of paddle length you can talk to 20 different SUP boarders and get 20 different answers on what is best because this is down to so many factors – age, sex, height, body type, your natural style of paddling and a hefty dollop of personal preference. As a general rule of thumb paddle lengths will fall in the range of 8” to 12” taller than the boarder with the lower range applicable to surf conditions and the higher applied to flat water situations. Adjustable length paddles are also available and not a bad idea if the paddle will have shared use.
On the subject of production material……..as is true of much sporting equipment, the best paddles tend to attract the higher price tags. At the budget end of things are the aluminum shaft/plastic blade type with their disadvantages of greater weight and lesser durability. One step up the scale are the fiberglass type which are less heavy and likely to last longer while top of the paddle pile goes to the carbon type. There are some paddle board purists who insist nothing less than a traditional wooden paddle will do – all very well if your intention is to end up with Arnie-sized arms.
A Leash
Consider you leash – attached to your leg via a Velcro cuff – as the umbilical cord which tethers you to a great big flotation device of safety – your board. Wind, current and waves can quickly put more distance between you and your board than you have the strength or ability to swim but this can’t happen with a leash attached.
The second and no less important purpose of a leash is to ensure your board doesn’t wander too far from home, taking out other water users as it goes.
Check that any leash you buy is intended for SUP purposes – a traditional surf leash is not strong enough – and ensure the length is about 1 foot longer than your board. Anything shorter than this risks bringing you and your board into far too-close-for-comfort proximity in the water and can turn your trusty board into a lethal weapon.
Leashes come as coiled or flat varieties – the first is typically better for less drag on flat water while the latter is usually preferred for fast river and surf conditions in which a coiled leash could get easily entangled.
Life Jackets/PFDs (personal flotation devices)
A board and paddles are essential equipment for SUP, life jackets a matter of preference. If it helps with your confidence go for it – there are some SUP-specific light-weight models on the market which won’t restrict your body movements.
There is an exception to the optional wearing part though – if you are intending to board in coastal waters outside of a designated swimming, bathing or surfing zone within the U.S you are a ‘vessel’ according to USCG regulations and must carry an approved life jacket. If you’re over 13 you don’t have to actually wear it but you will need to carry a whistle, flash-light and distress signal.
How on Earth do I Get that Great Big Piece of Kit into the Water?
We’re not going to lie – carrying a stand up paddle board isn’t easy but there are a few tricks and tips which can make the seemingly impossible much easier.
For starters most SUP boards have a built in carry handle which has been placed in just the right spot to balance things and this will work fine if you haven’t got a great hike to the water in front of you. If you’ve a little further to go you have a few options:
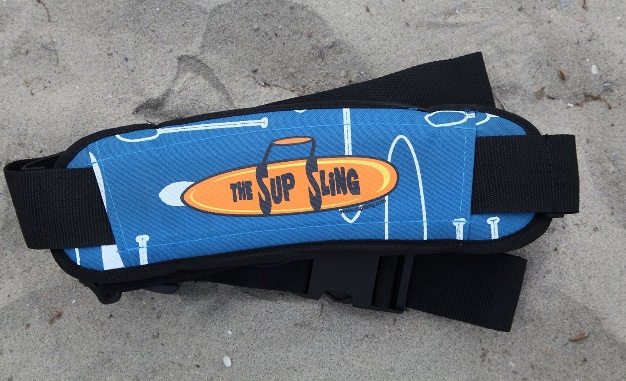
The SUP sling – Essentially this is just a padded strap which allows you to carry your board sling-like from the shoulder. Designs such as the pictured can also hang your board on a wall to save space when it is not in use.
On your head – Make sure you start off with your paddle in one hand or at least on some raised surface or its going to feel like a long way down to the ground to pick it up (and even further back up) with the board on your head.
- Lie the board on the ground with its top part (deck) downwards
- Lift the board from the rear end (the tail) so that the front (the nose) is still resting on the ground
- Walk one hand after another up the sides (the rails) of the board until you get to the middle
- Place this midway point onto the top of your head and come to an upright position
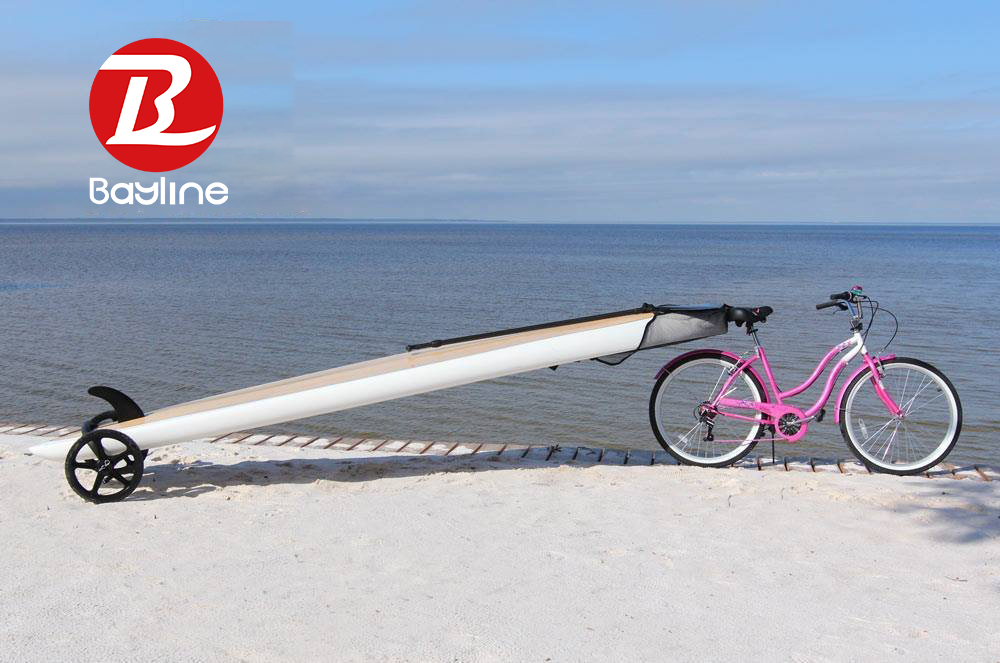
The mini trailer – This small 2- or 3-wheeled piece of kit is no good for rough terrain but a godsend otherwise – no carrying required, just a little pulling.
Bike trailer – As the name suggests, this carry-aid attaches to a bike and makes life much easier. Again though, not so great unless the terrain to be covered is regular.
Getting Wet: How to Enter the Water and Get onto Your Feet
We’re assuming you have chosen the time and place wisely for your first SUP forays and just in case you’re not sure what constitutes ‘wise’ here’s a few pointers –
- a day free of strong breezes
- a sheltered or otherwise calm body of water (strictly no waves unless you’re with a qualified instructor)
- somewhere crowd-free
- with an easy entry point – i.e. no long drop to the water and a gradual increase in water depth
- ideally an underwater surface free of rocks
Now follow these steps:
- Wade into the water and once you’re sure the fin of your board won’t be scraping the bottom place your board onto the water.
- Put your paddle across the board just in front of the carry handle point. While still holding the paddle in place lift a knee and place it on the side of the board furthest from you, followed as quickly as possible (for stability purposes) by your second knee. Ensure you are as centrally placed between rails as possible or the board will ride lower in the water on one side than the other.
- As tempting as it may be to get to your feet (especially if you’ve got this far without incident) it is more sensible to stay in this position for your first little paddle about to familiarize yourself with how the board responds to your movements.
- When you really can’t hold yourself back any more you can try standing but should this urge not kick in at all for your first session/s it really doesn’t matter. Place your paddle exactly as you did when you first entered the water, turn your toes underneath and, one after the other, draw your knees to your chest. For the greatest stability keep your backside down, your feet flat and shoulder width apart and your head looking forward. When you stand to your full height don’t lock your knees but keep them slightly bent.
- Once you’re up and feeling relatively stable have a look around your board and see where its various parts are in relation to the water. Nose and tail should be level as should both rails. If anything is dipping down below the water or rising up above the other parts you risk tipping once you get paddling as well as creating drag.
The trickiest bit is to transfer from kneeling to standing because no matter how supple you are you will have to pass through an unstable position at some point. Beginners tend to make tentative jerky moves which, although understandable, actually de-stabilize you. A quick transfer is the best for stability and also allows you to get your paddle into the water sooner – yet another aid for balance.
Basic SUP Techniques
The Basic Stance
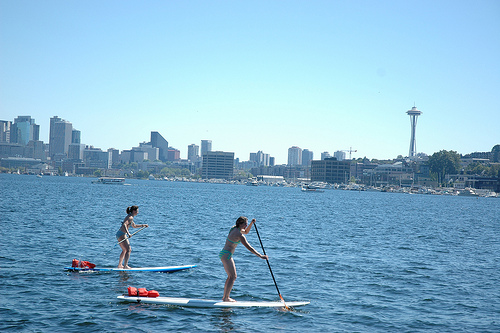
There are several stances which you will learn as a SUP boarder but at the very outset you’ll just need one – the neutral stance. In this your feet are placed flat and shoulder width apart on either side of your board’s center line (stringer) while your shoulders and hips are square and forward-facing.
A slightly bent knee position is maintained throughout along with a head which is firmly fixed on where you’re going and not what your feet are doing.
Falling Off and Getting Back On
If you’ve chosen your equipment and your start-out conditions well you might not actually fall off at all in the beginning stages but familiarizing yourself with what it involves will stand you in good stead somewhere down the line when it is forced on you.
- Toppling off your board is almost always led by the shoulders which gives you time to ensure you fall away from your board AND give it an extra little push with your feet to create some distance between it and you to avoid collisions. Avoid head first dives – even if there are no rocks the bottom may be closer than you think.
- Don’t attempt to keep hold of your paddle if it means falling on it – it floats and can be recovered easily.
- Remember – you’re attached to your board via a leash – it’s not going anywhere but your paddle might be so concentrate on that first. If the worst happens and your paddle ends up far off don’t try and swim while dragging your board. Get on your board and paddle it lying down with your arms as you would a traditional surf board.
- There are no hard and fast rules about getting back onto your board. Approaching sideways on you can use the carry handle to help you out of the water or you can clamber aboard by sinking the tail should you approach from that direction. Play with it a little and find out what best suits you.